Quilting the Quilt: Stop stressing over tension
Download the PDF version of this article
“My bobbin thread is a flat line on the back of my quilt!”
“I get eyelash stitches around curves.”
“I see bobbin thread pulling up to my quilt top!”
Any of these laments sound familiar? Poor tension is the No. 1 issue machine quilters struggle to correct. The first critical step in solving it is getting over the fear of actually changing the top or bobbin case tension. Admonishments of “never touch the tension” from a home ec teacher might still sting your ears, but it’s time to silence that inner voice and put on a brave “I can do this” attitude!
Properly balanced top and bobbin tension means that neither thread wins in this constant tug of war. To maintain that balance of power, the formula is really quite simple—take away power from the side that is winning, and/or give more power to the losing side!
Since the top tension is easier to access, it’s simpler to adjust that first. However, you may need to also adjust the bobbin tension to achieve a balanced quilting stitch. Top tension adjustment on domestic sewing machines is accomplished by changing a dial or computer setting in small increments. However, my longarm uses an industrial tensioner, so I turn the knob at least a half-turn when adjusting the top tension to see results.
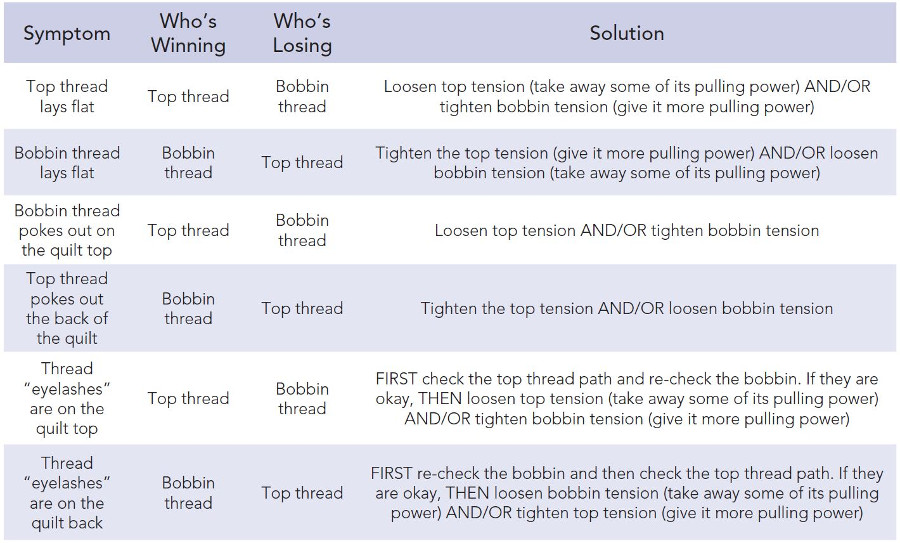
The industrial simple disk tensioner squeezes the thread between the disks, which makes it easier to use lots of different thread types. Turning the knob clockwise increases the top thread tension, while turning it counterclockwise reduces the tension. The bobbin case tension is adjusted by turning the larger screw on the outside of the case the same way: clockwise to tighten, counterclockwise to loosen.
However, the bobbin case is much more sensitive to changes. Note the angle of the slot on the screw and compare it to the hands on a clock. Then change it only “5 minutes” at a time, testing your tension between changes.
Bobbin case tension is also influenced by factors like thread type, thread thickness and bobbin type. Therefore, be willing to adjust it more than you may think. As long as you have good tension with a particular setting, don’t worry if it disagrees with some arbitrary “drop distance” test for your bobbin. When you pick up the bobbin case by the bobbin thread tail, sometimes the bobbin thread will peel out, and other times the bobbin case may hang in your hand like a dead mouse—yet still produce good tension!
While tension is certainly affected by your machine’s tension settings, other factors in your quilt may also impact it. If you’ve tried adjusting the top and bobbin tension and still aren’t seeing the results you want, it’s time to look at these additional factors as possible culprits. Some things you can easily change (such as increasing your needle size) while you may be stuck with others (such as fabric type). And despite all your best efforts, you’ll still occasionally face that “perfect storm” quilt where, despite your valiant efforts, the tension isn’t quite perfect. (Here’s a trade secret—that’s why quilters so often use busy print quilt backings!)
Here are some factors to consider when you’re not happy with your machine’s tension.
Needle Size
Use the correct needle size for your thread type. Thicker threads or natural fibers tug harder on the needle, making it flex as you quilt. That makes it a moving target as your machine tries to form a lock stitch, pulling it out of alignment. Increase your needle size with these threads.
Quilting Speed
If you quilt at breakneck speeds, your needle is dancing wildly. Slow down and you’ll be surprised at how much better your tension
looks, especially around curves. Moving too fast is a common cause for eyelashes!
Quilting Direction
Sewing and quilting machines form stitches the same way. When you move in a direction that’s opposite of that, the stitches look different. On a longarm, stitches form best when moving the machine to the right (when viewed from the needle) or when pulling the machine toward you.
Stitch Length
The smaller your design is, the shorter your quilting stitches should be. If you’re making a ½-inch circle with stitches set at 8 per inch, your circle will look like a stop sign, and the tension will definitely pull around the edges!
Thread Type and Thickness
Though it’s normally weaker thread, cotton thread tugs on the needle harder, affecting its performance. Use a larger needle with coarse cotton thread or strong polyester thread. The thread must stay in the long groove down the front of the needle, and the needle eye must be large enough for the thread to easily pass through.
Batting Type and Content
Thin, flimsy batting doesn’t leave much “middle” for your threads to lock between the quilt top and backing. Use batting with a little loft for greater success.
Fabric Type and Content
Tightly woven fabric makes your quilting needle work harder to pierce it, which increases needle flex. That then leads to tension problems. Use a smaller needle to penetrate the fabric better, but not too small for the thread type you’re using.
Tension adjustment remedies
This handy chart will help you remember what tension adjustment to make on your machine for common tension problems. But remember, if adjusting the top or bobbin tension doesn’t work, look at those other factors to see what you can adapt for the best possible outcome: