Playing with variations of machine quilting feathers
Feathers are a classic machine quilting motif that lend elegance and beauty to any quilt top. However, they can be challenging to the new machine quilter. Of course, the key to mastering feathers is practice but it also helps to find the feather style that you like best.
The most traditional feather would be the Amish style feather. In a previous article, we focus on how to practice feathers and how to find your own personal feather style. You can access that article by clicking here. One of our guest blog writers, Valerie Smith, shared two variations of a more formal feather, including how to make the “bump-bump” feather in her article. You’ll love the quick videos she did showing how they are made too!
There are dozens of different ways to make a feather and we’d like to help you find a few that you can use on your next quilting project. In this article, we are going to look at the path you’ll take that can be used to create a mountain of different feather variations. Over the next few months we will explore a number of them in hopes you will find your own personal feather plume that speaks to you.
Bump-bump feather
To set the stage for learning the first feather variation, let’s break down the movement of the bump-bump feather Valerie wrote about in the article linked to above. The path taken to make this feather style is the basis upon which a mountain of other styles are based.
First, make a spine. You can mark this on your fabric with chalk or your favorite fabric marker. You could also stitch the spine with thread if you’d like. I have found it easiest for my students to learn how to make feathers starting from the base of the spine first, though. Making feathers from the top of the spine down to the bottom is a unique skill that takes a little time to develop in my opinion.
 The first plume goes on your spine starting from the base. I have found that some of my students benefit from having a shape in mind when they make this first plume. Some folks think of a half a heart. Others think of an ear or a teardrop. I like to think of a paisley but then, I’m a little obsessed with paisleys!
The next feather is going to kiss the first plume you made and then bump back over the top of your new feather in order to kick out into the third feather plume for your spine. That bump back over the top is the challenging part because it involves backtracking. I recommend using a skinny thread to hide any wobbles or bobbles off that backtracked line.
Now that you know the danger is in the backtracking when making this feather, let’s avoid doing it all together and see what feather variations use that general movement but don’t involve actual backtracking. I’ve included a downloadable PDF for you to print out and trace over to practice stacking these feathers on a spine.
Curled feather
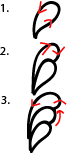
 Once you get the hang of using that second feather to stack on top of the first one while using the tip of the plume as your exit ramp to travel to the third plume, the world will open up to you! There are so many things you can do in that little travel space. For starters, let’s just use a common curl.
Draw the first plume and while drawing the second one go past the head of plume #1 and really curl into the center of plume #2. Think of the top of plume #2 as the face of a clock. You really want to tuck your curl all the way into the center of the clock face to get a nice curvy curve.
Once you’ve tucked your curl in, you can exit out but don’t even try to backtrack on the same line. Deliberately cross over the line until you reach the spot where your third plume will kick out and form.
Curled feather variation
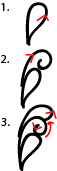
![]() Sometimes it is helpful to explore a slightly different way to make the same thing as there are some folks who will find one way easier. We will wind up with the same essential look but this time instead of starting with a plain plume, start with a curl. then when you curl back, you’ll kick out into a new plume from the curl. Play with both ways to make the curled feather and see which you like best!
Sometimes it is helpful to explore a slightly different way to make the same thing as there are some folks who will find one way easier. We will wind up with the same essential look but this time instead of starting with a plain plume, start with a curl. then when you curl back, you’ll kick out into a new plume from the curl. Play with both ways to make the curled feather and see which you like best!
Play with these two feather styles to get the path locked down in your brain. Once you are feeling confident with the path while drawing on paper, move to your machine and stitch it out on some practice fabric. We’d love to see how you are doing! Please post a photo of what you are working on over on our Facebook page!