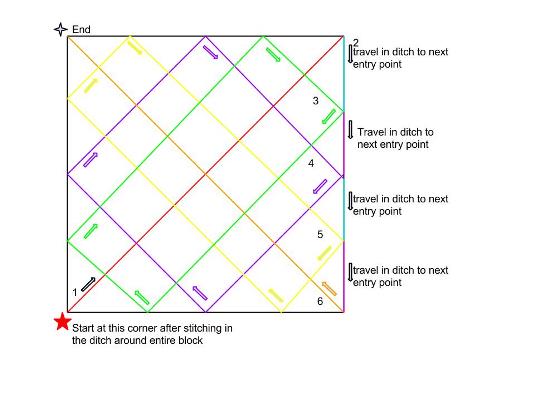
Finding a path for crosshatching

Crosshatching is a useful technique for any quilter. Straight line crosshatching is traditionally found behind applique and even a small amount of crosshatching can dress up a quilt top. When used behind curvy applique it gives the eye a place to rest as the viewer takes in the patchwork in the quilt.
When stitched with a longarm we want to try to avoid as many stops and starts as possible. If you are new to crosshatching it is best to mark every line so you can minimize confusion and provide confidence in the spacing chosen for the lines. You can use a water erasable or air erasable fabric marker or select one of the dozens of crosshatching stencils available.
The first step to good crosshatching is to stabilize your block by stitching in the ditch. This will minimize the fabric draw up that will be experienced as you quilt your background grid. Also consider the weight of the thread you select when tackling crosshatching. A thick thread will not be forgiving if you have any wobbles or bobbles in your stitching line. Consider using a 60wt polyester thread or even a 100 wt thread which will nestle down in the fibers of your fabric and forgive any small mistakes you might make.
After stabilizing the block by stitching in the ditch, start your crosshatching path in the longest path of your space which is typically one of the diagonal lines from one corner to another. I like to start in the lower left corner of a block and stitch up the diagonal to the upper right corner. Once the upper right corner is reached, travel down the ditch provided by the block’s seams to the next entry point which is the next line that is parallel to that first line we stitched. Take a look at the diagram to find the path of stitching.
Keep in mind that using a ruler for straight line stitching like this is critical on an APQS quilting machine. Our machines move very easily which can make perfectly straight lines difficult without a ruler. If you have the Bliss drive system on your machine the diagonal lines can be made freehand because your machine will move very smoothly on the diagonal. However, it is always a good idea to use a ruler for more accurate diagonal lines. Be sure to pop a ruler base on your machine to support the ruler when using it on your longarm machine.
Normally you’ll be placing the diagonal crosshatching behind an applique. This means you’ll need to hop over the applique before you restart the path on the opposite of the applique. If you are quilting for a show quilt you’ll need to knot and bury those threads. If you are working on a non-show quilt you can get away with taking some tacking stiches and dragging the thread to the stitching line on the opposite side of the applique. The other option would be to travel around the edge of the applique to the next entry point of your line but the danger would be a great deal of thread build up around the edge of the applique.
You’ll find that traditional diagonal cross hatching is easier to do on our APQS longarm machines equipped with the Bliss drive system. We’d love to see the quilts on which you’ve used crosshatching. Share them on our APQS forums or over on our APQS facebook page. We want to know what you are working on!
Angela Huffman is an APQS dealer and the owner of Quilted Joy Studio in Louisville, Kentucky


