How to accomplish curved crosshatching
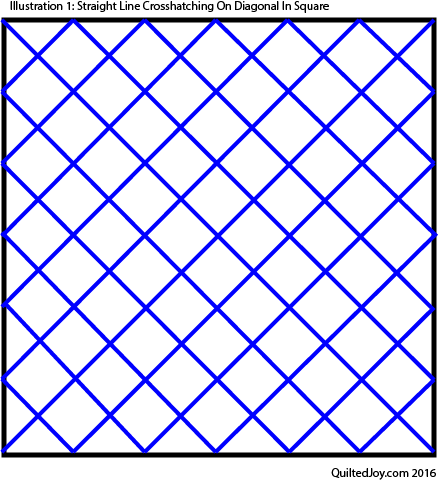
Straight crosshatching is a very popular design motif that can be found on a multitude of antique quilts of yesteryear as well as today’s masterpieces. It gives a formal look that is beautiful, adds wonderful structure to patchwork and it can be accomplished easily using a longarm machine.
A contemporary alternative to straight cross hatching is curved crosshatching.
This grid based design is a lovely way to add movement and dimensionality to a quilt and is especially effective on neutral fabrics where the texture of the motif can be easily seen. Take a look at the difference between the look of straight crosshatching on the diagonal (Illustration 1) versus the same block with curved crosshatching that emanates from the X and Y axis (Illustration 2).
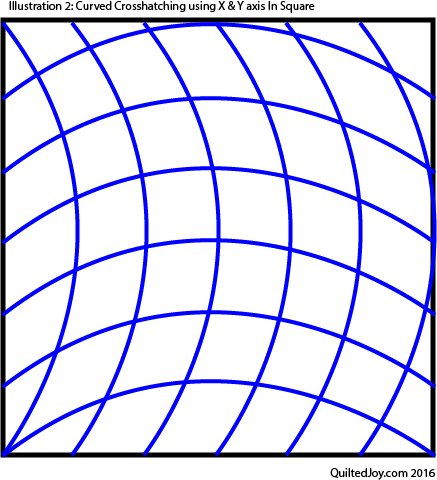
It looks complicated, doesn’t it? It isn’t but this is one of those techniques that requires the use of a ruler so the arcs of the curved crosshatching lines are the same as it radiates from one side of the space to the other. Keep in mind that the final look will vary based upon the depth of the curve provided by the ruler you choose. There are a variety of great rulers out there but my two favorites are Deloa’s Boomerangs or Pro-Curve Lite Rulers.
First, decide what size grid you’ll be stitching. Keep in mind that while a tiny quarter inch grid might sound like a wonderful idea at first, you may regret how long it will take you to place this grid in the blocks on your queen sized quilt. In general, I like to keep the grid size no smaller than 1/2” for most quilts. If the quilt is going into competition then all bets are off. You’ll find grids that are as small as 1/16” in the amazing works of art sporting blue ribbons at the most prestigious quilt shows around the globe!
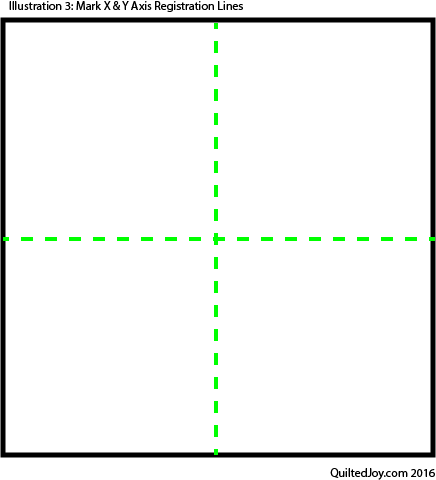
The first step is to stabilize the area you will be filling with the crosshatching. For this article we will be working with a square. Stitch in the ditch around the block prior to filling it with crosshatching. This will prevent the block from becoming distorted as you add the crosshatching lines. Using your favorite marking device, draw in a registration line down the middle of the block both horizontally and vertically. These lines will help you keep your ruler properly aligned.
Position the needle in the upper left corner of the block. Keep the center etched line in your curved crosshatching ruler aligned with the registration lines you marked previously. Position your ruler on the left side of the machine’s hopping foot using the ruler foot for your machine and an extended base. Refer to this article for more information about how to hold and use rulers safely with your longarm machine.
Run the machine down the curve of the ruler to the bottom left corner as shown in Illustration 4. Travel along the seam’s ditch to the next entry point as shown. Slide the ruler to the next position while keeping the etched center mark on the ruler aligned with the center mark you made through the middle of the block. Continue in this manner until you reach the opposite side.
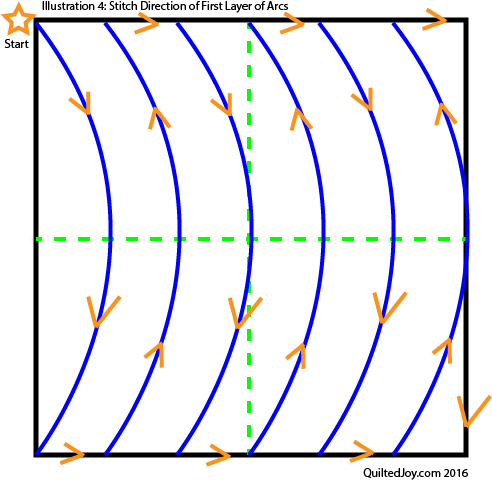
Break your threads or travel down the ditch to the lower right corner and move the machine along the edge of the ruler to the lower left corner.
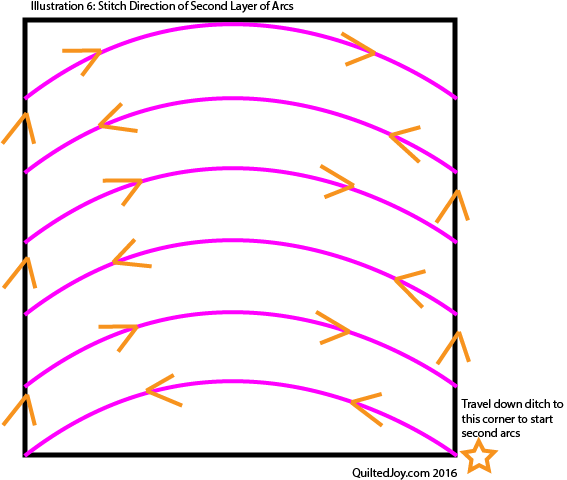
Travel along the ditch to the next entry point while being sure to keep the ruler’s etched middle line oriented to the registration mark you placed denoting the center of the block. Continue to follow the stitching direction as shown in the diagram.
While the specialty crosshatching rulers have etched lines designed to allow you to stitch out curved crosshatching without marking any of the stitching lines, I recommend you go ahead and draw out the curves you’ll be stitching if this is the first time you’ve tried this technique as it is much easier to erase an errant drawn line than a stitched line. Once you’ve worked with curved crosshatching a little more you may find you do not need to drawn out the path but, for now, go ahead and mark everything before you stitch.
There are a multitude of ways to add variety to curved crosshatching grids. This article has focused on placing curved crosshatching in a square in a very uniform way. But take a look at how amazing it is in a pinched diamond shape.
Has spring finally sprung where you live? Charlotte’s “Spring Fling” quilt will make sure you know spring is right…
Posted by APQS on Thursday, March 12, 2015
In my opinion, the real power of curved crosshatching comes out when you prevent the first two intersecting arcs from crossing over each other along two sides of a square, triangle or other shape. This provides a frame that allows one to direct the eye as it flows over a block. Here are two examples. Aren’t they lovely?
Hop on over to Pinterest to check out our Holiday Quilts board for some festive inspiration…or just to check out some eye candy! 😉 http://bit.ly/1QaB3xQ
Posted by APQS on Monday, December 7, 2015
Myrna created this blue and brown beauty! Make sure you take a look at the border and her intricate quilting throughout. Amazing! http://forum.apqs.com/index.php?/topic/27442-new-quilt/
Posted by APQS on Friday, January 16, 2015
Take a look at the negative spaces in the next quilt you work on to see if curved crosshatching might enhance your patchwork. If you have any questions, post them over in our APQS.com forums- there is a wonderful community of quilters there who’d love to help. Do you have an example of curved crosshatching you’ve done on a quilt? Share it over on our Facebook page! If you have any questions about APQS machines or the accessories that make curved crosshatching easier, call an APQS store or contact your local dealer. We are here to help!
Angela Huffman is an APQS dealer and the owner of Quilted Joy Studio in Louisville, Kentucky