Quilting the Quilt: Quilting design ideas (Part I)

Have you ever thought about using the motifs in fabrics to create your own quilting designs? In my previous article, I showed you how to use floral, novelty, and baby print fabrics to trace designs. (See Quilt Yourself a Garden in the May/June 2014 issue of Love of Quilting). Here I’ll show you how to use those designs on your quilts.
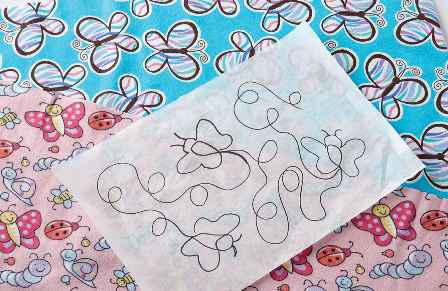
If you’re a longarm quilter, you can choose to draw design elements on long paper rolls to create your own unique pantographs. I’ve traced a few butterflies onto paper to show you how, turning the butterflies in different directions to make them more random (Photo A). Of course, once you trace your first butterfly you can enlarge it using a copy machine if the original fabric design is too small. Then use the newly-sized drawing to trace additional shapes onto your paper. Add the single individual elements first so that you can place them where you want them. Then connect the designs using your favorite method such as loops, swirls, or other meandering methods.
If you sit down to quilt, try tracing the design onto water soluble stabilizer. Stabilizer is available in clear plastic rolls as well as in paper form (some can even run through your computer printer!). You can stitch right through the stabilizer and tear off as much as possible when you’re finished. Any remaining stabilizer will dissolve during the quilt’s first washing. You can also cut your shape from sturdy card stock or template plastic and trace around it directly on your fabric, using your favorite marking tool.
Busy floral prints are common backing fabric choices. The variety of colors helps hide any inconsistency in quilting lines or even tension issues on the back of the quilt. However, you can also have a lot of fun using that backing fabric as your overall quilting design—just turn the quilt over and quilt from the back! Since the fabric already has the design spacing figured out for you, all you need to do is stitch around the design elements and you’ll quickly have a creative quilt design completed with no marking at all.
You can have lots of fun outlining the shapes on the backing fabric. Don’t worry about being precise, and don’t quilt over every single line in the print. Keep thinking “outline only,” adding only enough quilting detail to convey what the shape is supposed to be. If you add too much detail, you’ll lose the image on the front of your quilt, and it will look like scribbling instead of a discernible design.


