
How to tackle wavy borders
Quilting for others means getting all sorts of quilts in the door. Some will definitely be better than others in terms of piecing accuracy. Even if you choose only to quilt for yourself, chances are that your quilts won’t be as perfect as you’d like them to be. Even “type A” quilters reach the point where they decide “done” is better than “perfect.” Wavy borders that are too full for the quilt itself are one of the most common challenges facing a longarm quilter.
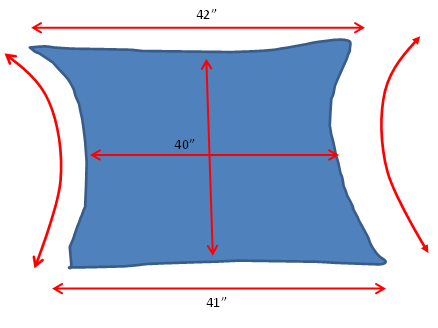
Before loading your quilt, measure the quilt across the middle and then along each edge. Do this for both directions. If you’re trying to turn out a “square” quilt then your goal is to find the best way to bring those excess borders more in line with the narrowest parts of the quilt. The diagram shows an example of measurements for the width of a quilt—the narrowest measurement is 40” so I’ll need to find a way to make the top and bottom borders get close to 40” as well.
Option 1: Ease the borders as you load them to your frame
To decide if this solution will work for your quilt, keep in mind that you cannot ease in large amounts of excess fabric on small quilts. You may only be able to ease in an inch of extra border fabric on a small quilt, but you may be able to ease in several inches on a very large quilt. Your success depends on whether you can also use batting with more loft (to help absorb the excess fabric) and whether you can use an appropriate design that will distribute the fabric evenly rather than shove the fabric only to one side.
Make good design choices
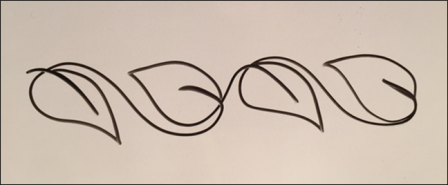
The leaves in the drawing below push the fabric back and forth, making it a good choice for wavy borders.
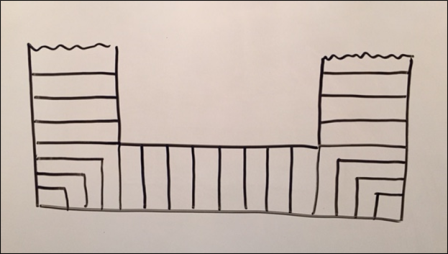
A “piano key” design is also very effective for handling wavy borders. Straight lines from the inner seam of the border extend to the edge of the quilt. Since these lines can be spaced any distance apart you can easily slip extra fabric between the lines and hide the fullness. Add more lines to disguise fullness even more. The drawing below shows one way to handle the corners if you use piano key quilting.
Make border adjustments easy by marking your canvases.
Before you attempt to ease in your border, make sure your canvas center markings are still accurate and that all of your canvases align correctly with each other, centers to centers. If they do, you may want to add one-inch markings to the canvas edges using a marking tool to help you ease in the borders quickly.
Mark each canvas edge in one-inch increments, starting at each center and moving outward to the ends of each canvas shown at right. The center becomes “0;” add the numbers 1 at time one inch apart until you reach the end of canvas.
NOTE: This method works well for machine quilters who pin their quilts to their frame. If you use zippers to load your quilts, you can also mark the zipper tapes. (Easing in the quilt is more difficult with loading methods that use snap-on loading devices since it’s hard to accurately adjust the fabric while pressing the snapper in place. If you use this loading method normally but want to ease in a quilt, consider removing the snapping dowel and pinning directly to your canvas instead.)
Border easing steps:
- Choose which two ends of the quilt you’ll be pinning to the frame. Locate the measurement that represented the narrowest section of the quilt.
- Find the “true” center of your quilt—follow a center seam out or down from the piecing or other reference line. Don’t just fold the quilt in half along the border. That only finds the center of the border fabric. Mark with a pin.
- Align the quilt’s true center with the “zero” mark on your quilt top roller and pin in place.
- Mathematically divide the narrowest part of the quilt in half (in our example that is 20 inches.) Align the left and right edges of the quilt to the “number 20” you marked on your quilt top canvas to the left and right of the center “zero” mark. Pin the end in place.
- Start “splitting the difference” between this outermost pin and the center pin, placing additional pins along the canvas until you’ve effectively eased in one section of the border. Now repeat for the other section along the quilt roller. Your quilting will “lock” the border down to its new size.
- If you “float” your quilt top routinely, then attach the backing to the take up roller as normal, and quilt a reference line through the batting and backing. Now mark the center of your reference line, and measure out along the reference line until you reach the measurement that represents the left and right edges of the quilt as described above. Mark these locations on your line. Bring each outer edge of the quilt top to these marks, and then ease in the top along your reference line, using pins to secure it in place. If you intend to quilt off the edge of the top, then also single-stitch baste along the edge to secure it before removing the pins.
Option 2: Re-doing the border
Removing and reattaching the border is always an option (though seldom pursued). Let’s face it…by the time you’re ready to quilt that quilt, most people have moved on to the next project and have no interest in a “re-do.”
Option 3: Spray starch and steam
Sometimes a quilt is out of whack simply because it’s been handled a lot before quilting, which allows the fabric to stretch out of shape. You may be able to tame the unruly sections using heavy spray starch and steam.
Position the offending quilt section over a heavy towel or ironing board. Heavily apply spray starch the area. Next hold a hot iron on full steam over the section. Carefully manipulate the fabric back in place (be careful—the steam is hot!) Place the iron on top of the fabric but do NOT slide the iron—you don’t want more trouble.) Lift the iron and reposition the fabric as needed.
You can do this technique on the frame, but you’ll need to use a very heavy towel under the quilt as you push down from the top with the iron—you don’t want to get your hand burned from the heavy steam, and you also don’t want to distort the quilt from too much pressure.
Option 4: Take a tuck
With this method, you’ll need a seam ripper. You’ll be removing the section of the border (or borders) where you find the most fullness along a side. You do not need to remove the entire border. On small quilts, one tuck is usually sufficient. On larger quilts, consider two or three smaller tucks, avoiding the center of the quilt for any adjustments. Since the eye is drawn to the center naturally, you’ll want to avoid calling attention to a “fix” in that spot.
- Measure the quilt across the middle vertically and horizontally and determine if the centers are the narrowest sections of the quilt. You’ll be taking out excess border fabric to help the border measure these same dimensions.
- Locate the area(s) along the offending border where the fabric appears fullest. Take out the seam securing the border to that section of the quilt (you’ll need to remove about 12 inches or so to make the process easier.)
- On an ironing board, manipulate the quilt border(s) until you’ve created a fold that appears to come out at a right angle from where the border is attached to the quilt. Try to avoid taking more than a ½” tuck or pleat in one place.
- Lightly press the pleat in place. On your conventional sewing machine, sew along the fold you’ve created on the wrong side of the quilt border. Be sure to use thread that matches the border fabric. On multiple borders, heavily pin the intersections and consider pressing the seams open in the area of the tuck before sewing the dart.
- Trim the seam allowance to ¼”, and then press open.
- Reattach the border to the quilt.
Option 5: Quilting the quilt “as is”
Yes, this is an option! Sometimes a quilt isn’t destined for anything more luxurious than to be spread out on the grass for a picnic or cuddled under while watching a TV movie. Quilting a project just as it is will not produce a square, perfect quilt. The borders will still be wavy, the blocks will still be poofy. But it will be done!
The only time I question a person’s decision to not address wavy borders is when it will first appear in a show or other venue where it will be critiqued (and since my name is on it as the quilter, I want us BOTH to look good.) In that case I discuss the options with the piecer, looking for one of the alternatives that can address the problem without breaking the bank for her.


